Did you know that kerosene has been known to humanity for about 12 centuries? It looks like only now folks started realizing how useful this fuel can be for domestic heating. Here’s an opportunity for you to become acquainted with the best kerosene heaters available.
Read through our guide below and see a lot more information than just the best kerosene heater reviews. Our crew has put together an article highlighting the types of kerosene heaters, their features as well as differences, and similarities. We can’t skip giving you a few comparisons and of course – safety tips.
See The Quick Comparison Chart
What is a Kerosene Heater and Kerosene Heater Types
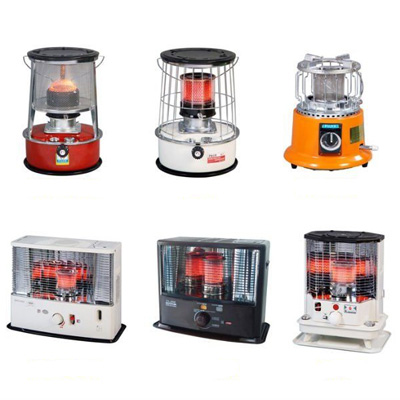 By reading about our top picks above, you have perhaps realized that there is one major difference between kerosene heaters. In the first category are the forced-air units and among them, you might find your best kerosene heater for the garage. The second type is convection, also known as portable, kerosene heaters. These are used inside homes more often than not.
We are not going to take a deep dive into the anatomy of each type but we still need to outline some of the main differences in order to help you make an easier selection.
Purpose
So we already mentioned that the main difference comes from the purpose of your kerosene heater. Upon careful inspection of the units in the previous section, you will notice that the forced-air ones are somewhat more powerful. This is because they are good for larger areas, construction sites, garages, and workshops. Their whole build-up is aimed at warming up a large well-vented area.
The second type is the indoor kerosene heater. Not that the forced-air ones can’t be used indoors but these portable ones are also good for residential use. The convection heating process is a silent one and it doesn’t blow anything around. These are not heavy duty heaters.
Power Supply
Another look at the forced-air kerosene heater reviews shows us that these “big boys” also require electricity to run. They have a fan and a number of other electrical components which cannot be powered by kerosene alone. Their main feature except for heating is blowing the heat around. This cannot be achieved without an electric fan and a generator.
The domestic kerosene heaters can simply stand in the middle of your room and will emit heat at 360 degrees. They are very similar to how the finest regular propane heaters work. No electrical input is required for these devices to operate. They simply need to be ignited and that’s it.
Heat Distribution
A fan is the main source of heat distribution when we talk about those larger forced-air kerosene heaters. They still have a flame in there but it wouldn’t be enough for such large areas regardless of the astronomical number of BTU that they might have.
On the other hand, convection heating is the bread and butter of a mini kerosene heater. They don’t have a fan and nothing is blown around. Actually, in order to even start the heater, you will need to have a wick. Kerosene gets soaked up in there and only then it is being ignited. Thanks to this mechanism, the temperature rises evenly in the room.
Best Kerosene Heaters Comparison Chart
| PRODUCT | DETAILS | ||
|---|---|---|---|
 | Mr. Heater Forced-Air Kerosene Heater |
| View On Amazon |
 | Sengoku KeroHeat Portable Kerosene Heater |
| View On Amazon |
 | Dura Heat Indoor Kerosene Heater |
| View On Amazon |
 | Master MH Kerosene Forced-Air Heater |
| View On Amazon |
 | Pro-Temp Kerosene Forced-Air Heater |
| View On Amazon |
 | Kero World Indoor Portable Convection Kerosene Heater |
| View On Amazon |
Best Kerosene Heaters (The Top List)
1. Mr. Heater Forced-Air Kerosene Heater
Garage work is made easy with this effective kerosene heater by Mr. Heater. The brand stays true to its reputation and puts only the finest components in this product. The strength is remarkable as you will be able to heat up more than 4000 square feet of space with one of these units.
Additionally, the tank comes with a capacity of 14 gallons. This means that the approximate maximum time for which the heater will function is about 10 hours. Any job site will be way better with the otherworldly 175 000 BTU of heat which are emitted from the unit.
Of course, there is a built-in adjustable thermostat because maximum heat isn’t always desired. Since this is an air-forced heater the high-output fan will ensure smooth operation without any visible flames. The convenience factors are enhanced by the presence of cord storage, a power indicator light, and pneumatic wheels for easy transportation.
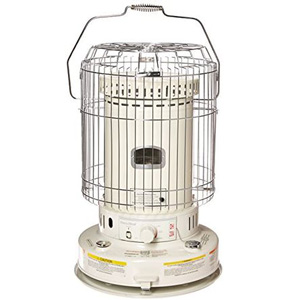
2. Sengoku KeroHeat Portable Kerosene Heater
This is a portable kerosene heater and it really got good after an upgrade that took place. The Sengoku KeroHeat Portable Kerosene Heater is easy to ignite because this process is automated. When it comes to safety, it hardly gets any better than that. It does have a protective grid in front so that nobody can get burned. Additionally, you get a tip over- switch-off and an automatic thermal shut-off.
When used indoors, fire alarms will not go off. Doesn’t need to be vented. Efficiency is also not an issue. This portable unit comes with a 1.2-gallon tank. This will last for about 14 hours. The estimated heated area is somewhere about 400 square feet – maybe slightly less.
When used outdoors, you need to keep in mind that the unit is not waterproof and that the batteries are not protected. Also, make sure you use kerosene only. No other fuel is compatible with this heater.
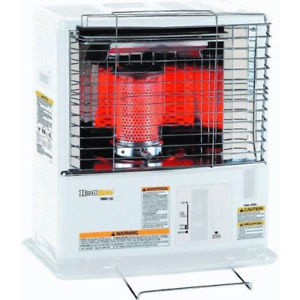
3. Dura Heat Indoor Kerosene Heater
Now we are going to look into a portable kerosene heater made by Dura Heat. This neat little gadget will not require any electric cords, no sockets, and no connections in order to function. Its BTU cannot be compared to one of the “bigger boys” as it is “just” 23 800.
The efficiency rating of this unit, however, is completely off the charts. If you connect it to a 1.9-gallon tank you will be able to keep the heating going for at least nine hours. On a good day, you might even get 12. The filling is done through a squeeze pump tool.
There are a safety switch-off and a protective grid all over the unit. It is important to note that some states in the US prohibit the use of such products indoors. When used for the first time, it is best if the heater is left outside for about 30 min so that it can burn off oils.
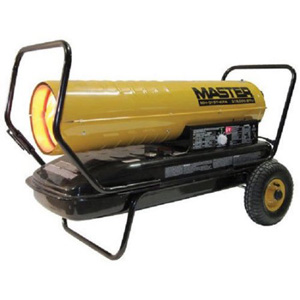
4. Master MH Kerosene Forced-Air Heater
This is one of the more powerful units on our list and even though it comes at a price it will definitely be of outstanding help top any construction site. The huge output of 215 000 BTU will warm space of at least 2500 square feet. The design of this one is also not to be underestimated.
You will find two useful handles along with steady wheels for easy transportation. The front side also has a stand so that the heater doesn’t point downward. It runs on both kerosene and diesel. A little setback is that you can only plug into a 120V circuit.
An adapter would have to be purchased separately if you have a 240V circuit. The tank’s capacity of the Master MH Kerosene Heater is 13 lb. The fuel expense is about 1.63 gph. This will give you 8 hours of heat with 1 tank. Fumes can get stronger at times.
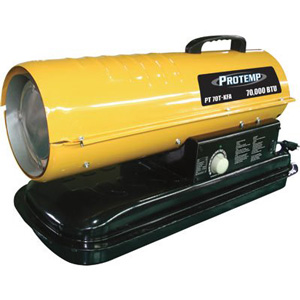
5. Pro-Temp Kerosene Forced-Air Heater
The size of this next product is quite convenient and it can easily be relocated using the easy-lift handle on top. There is, of course, a correlation between size and power and the Pro-Temp Kerosene is not going to be the most powerful unit on our list today.
You still get 70 000 BTU with it and this will definitely suffice for a 2-car garage or a medium-sized workshop. In other words, the total space you will be able to cover should be about 1700 square feet. Efficiency is also not absent here as you have this thing running for 9 hours straight by using just one 5-gallon tank.
Some other components worth mentioning are the built-in pressure gauge and the easy-grip fuel cap. The thermostat works in a pretty self-explanatory fashion and doesn’t require a lot of attention. A great benefit is a fact that the unit works not only with kerosene but also with Jet A fuel, Fuel Oil, and Diesel.
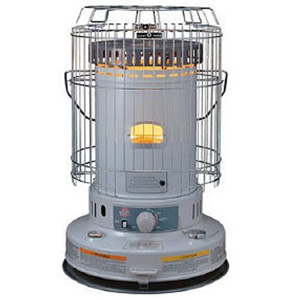
6. Kero World Indoor Portable Convection Kerosene Heater
The ignition on that unit is something that really adds convenience to the operation. It is matchless meaning that it won’t bear any danger to the user. As far as the most important specs go, they are pretty much standard for any indoor kerosene heater.
You get 23 000 BTU allowing to heat up an area of about 1000 square feet. The built-in tank isn’t huge (1.9 gallons) but it is pretty efficient. One full tank will be good for about 12 hours. It is suggested by the manufacturer that only clean kerosene is used as fuel. Diesel isn’t a good idea for indoor heaters because of the fumes.
What’s good about those little heaters is that they give you convection heat. Unlike forced-air heaters, these will warm up a room gradually and evenly. The unit is manufactured in South Korea. Comes with a wick – just unpack and use.
Portable Kerosene Heaters
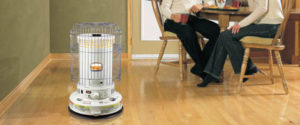
Let’s start by outlining some of the crucial phases during the use of each portable kerosene heater. We are going to become familiar with how to start up your unit, how to clean it, and how to change the wick. So let’s go and raise the temperature around here.
Starting Up
Most heaters will come in already assembled. The will have a metal grid all over the body. It serves as protection, accommodates the handle, and will also help provide residual heat. D-batteries should be included for the igniter. Matches can also be used.
A quick tip from us is to use something that manufacturers rarely will tell you about. Get a little bottle of kerosene fuel conditioner. This treatment will improve the overall performance of the heater, will prolong the life of your wick, and will make the unit more efficient.
Reading the instructions is crucial. Get them online in case you don’t have them on paper. It is best if you also build a little “kerosene kit” so to say. Get a plastic box and maybe add the following:
Kerosene Kit Items
- Rubber gloves – you shouldn’t touch any of the components barehanded.
- Kerosene can – don’t ever keep your kerosene in any other container. Otherwise, it will confuse you or your family members and can lead to very unwanted consequences.
- Battery-powered siphon pump – no need to pour fuel directly into the unit. Stick one end of the hose to the fuel intake tube of the heater. The other part goes into the can and kerosene is sucked through it right inside the device. All portable kerosene heaters for the home should be filled that way.
- Kerosene conditioner
Always use nice and fresh kerosene. This type of fuel starts decomposing and degrading in about 30 days. This means that you can’t have any of it just lying around. Wait for 60 minutes after filling the unit up. The wick needs to absorb the kerosene very well.
Turn the knob all the way to its limit, press the button below it and you will see that the heater lights up. Unlike a propane heater, here we do not have a Piezo ignition because we do not require a spark. Grab the little metal burner in the opening of the heater and move it back and forth rapidly a few times. In about 5-7 minutes you will enjoy a full flame – one that you can actually control by adjusting it down if needed.
Maintenance of Portable Kerosene Heaters
There are two important aspects to keep in mind when we talk about the maintenance of indoor kerosene heaters. None of the two procedures is very hard but both need to be properly done in order to ensure not only an efficient operation but a safe one as well. They are:
- Cleaning the unit
- Changing the wick
Firstly, there are three signs that your kerosene heaters require imminent sanitation. It will start smelling more. The smell is generally an unusual occurrence with kerosene heaters. This sort of fuel and its consequential combustion should not give off a lot of smell if any.
Next, the flame will start looking more and more yellowish. The kerosene flame is more in the white gamma. When the unit’s tubes and body get dirty, the flame becomes somewhat polluted. This leads to a yellow color. Obstructed tubes also mean that the flame will not burn as high.
Finally, the wick will get dirty. It needs to be regularly replaced but we will look into that procedure in a minute.
Cleaning the Wick
Start by removing the screws on the side of the lid and remove the whole thing. The heater is now basically split into two parts. Use the handle on top and move the upper body to the side. Take a look at the tube in the middle.
Raise the wick and you will quickly see that there will be some fibers and soot around the burner. This is the part which needs to be cleaned. The wick needs to be soft and pliable. There shouldn’t be any hard black spots there. So get a soft cloth, dampen it, and commence cleaning.
Finally, scrape the wick with a toothbrush. You have to do everything in your power in order to remove all the particles and other bits from there. Just make sure you do not get excessive moisture inside. If none of the above helps, then you need to replace the wick of your kerosene heater.
Changing The Wick of Your Portable Kerosene Heater
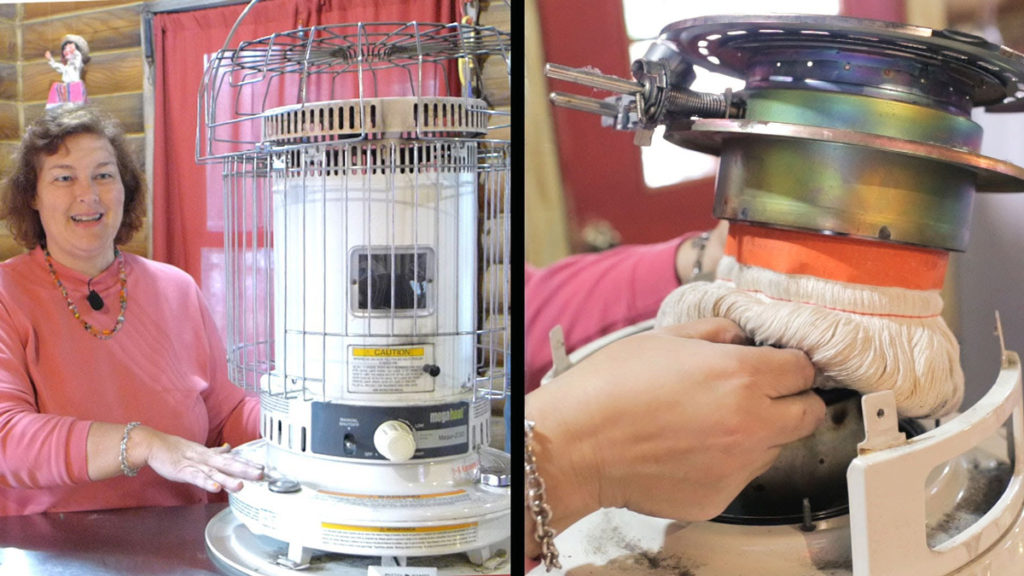
So let’s go back to the step where you disassembled the top part of the heater. This time we will also need to remove the base in order to properly replace the kerosene heater wick. This is achieved by also taking the battery compartment off (you just unscrew it), removing the fuel cap, and also pulling the control knob out.
Now you should be able to pull out the whole wick adjuster assembly. The gasket should remain there untouched. Remove the wick cover – simply rotate it a little. The wick will be right there in the middle of the can or slot. Well, no need to wait any further – remove it.
The new wick should be folded first and then its studs are supposed to go into the assembly. Press it so it sticks. Everything else now has to happen in the reverse order. The wick holder is put back but before you re-install the assembly, make sure to turn the knob a few times in order to raise the wick.
Before you put the cover of the heater back, test the wick raising mechanism. This will also allow you to confirm that the safety shut-off device also functions properly. Until you are convinced that everything is in order, keep re-installing the wick.
Taking Care of Your Forced-Air Kerosene Heater
Our not so smooth transition takes us to the second type of kerosene heaters. The forced air kerosene heater reviews above are not detailed enough to paint a good picture regarding those units. There is the finest regular propane heaters work you should perform on a regular basis in order to ensure long-lasting use of your heater. This work includes cleaning the kerosene heater.
Inspect the Photocell
That’s an important procedure and it needs to be done at least twice during the heating season. It won’t hurt if you check more often than that. Gently pull the cell out of the mouth which holds it in place. Dip a cotton swab in alcohol and carefully remove the dust from inside the photocell. Lens cleaner also works just fine. Make sure the sensor is straight after you put the photocell back in its assembly.
Clean the Fan Blades
All of the best garage heaters on the market regardless of their heating mechanism will feature a fan. The blades need to be free of debris. Make sure nothing impedes the movement of the blades. A damp cloth is your best ally here – just make sure you do not bend any of the blades.
Check the Fuel Filter
That’s another component that needs to be cleaned at least twice every heating season. The fuel line must be purged and the tank has to be empty. The filter can be rinsed only with kerosene and never with water. The air pressure also matters so here’s what has to be done.
Before you start operating the heater check the model number and the corresponding pressure setting for it. There should be a chart in the instruction about the correct setting for your unit. Be sure to locate the pump set screw. It would be typically right next to the pressure gauge at the backside of the heater. Rotating it to the right increases the pressure and of course, rotating it to the left will result in a decrease of pressure.
If any flames are extending outside of the heater’s front then you must decrease the pump pressure. Problems with ignition or the presence of smoke typically call for an increase in the pressure.
Clean the Fuel Nozzles
Before the start of the heating season is your time to clean the fuel nozzle. If this part isn’t clean then you are likely to get all sorts of ignition problems. Typically, it should be enough to simply clean it by blowing compressed air through it. If that doesn’t help, soak it in kerosene in order to decompose any dirt particles.
Maintain the Air-intake
His filter should either be replaced or washed in soapy water. This needs to be done every 500 hours of operation – preferably less than that.
Flush the Fuel Tank
After 200 hours of operation, you should flush your fuel tank. Water is not to be used here. No water should ever make its way inside the fuel tank. Use only kerosene for these purposes. Also, don’t ever leave any kerosene just sitting there for weeks. It will degrade and will not only be useless but can also be dangerous.
Propane vs. Kerosene
 Comparisons are inevitable between all sorts of cooling and heating systems and this section makes no exception. This is especially true when we consider products that are somewhat similar in the way they function. At first glance, propane and a kerosene heater are identical but are they really?
Efficiency
The price per gallon is very similar and the difference is less than 10% in favor of Kerosene. But what really matters in our case is how many gallons are used per BTU. In other words, the potential energy of the fuel matters, and kerosene has a clear advantage here. Propane should give you about 91 000 BTU per gallon while with kerosene you get 135 000. That’s a difference of about 38%. The tricky part is that prices vary and in time this comparison might change.
Availability
Kerosene is not hard to buy but more often than not, it comes in very little tanks. They are mostly sold by home improvement stores and this is not a reliable scheme. You want to get to a kerosene pump at a gas station. Those can be rare to stumble upon and are straight prohibited in some states. The problem is that stocking up is also not the finest option as kerosene has to be fresh when used. It goes bad if it stays in a tank for a long time. You can overcome this but you are looking at a huge investment in special drums and containers.
Propane is easy to get and there are readily available tanks in almost every town. This makes access to propane exceptionally easy and not time-consuming at all. This is clearly advantaged propane.
Safety
Propane definitely bears more dangers as these heaters work under pressure and there’s the threat of explosion. This shouldn’t scare people away but it is obvious that knowledge regarding safety is crucial. The whole ignition procedure of propane is somewhat dangerous if not done properly.
Kerosene needs a wick in order to create a flame. This doesn’t happen under pressure. Instead, the wick is soaked in the fuel and that’s how the magic happens.
Kerosene Heater Safety
Here are the most important kerosene heater safety aspects to bear in mind when operating a kerosene heater at home:
- Firstly, kerosene must be stored in a container strictly for kerosene. This way you will not have contaminated fuel and diminish the possibility of confusion.
- 1-K grade kerosene is your “go-to” fuel. Don’t ever think about replacing it with gasoline. Also, when at the station, you are to use only the kerosene pump. Mixing kerosene with any other fuel must never happen.
- Thirdly, purchase your fuel from a certified dealer.
- The way you refuel your unit also matters greatly. Never do it at home, do it outside. Keep the tank away from combustible objects. Make sure the unit is not turned on and that it is not hot. Don’t ever go above the “full” mark of the tank.
- In case you see any exposed flames or flare-up don’t ever move the heater. Switch it off or use a fire extinguisher on it. Call the fire department and have everyone leave the house.
- Proper maintenance and regular cleaning are a must. There’s no way around that.
- Operate your unit according to instructions and aerate the premises often. Install a carbon monoxide detector for your own peace of mind.
Wrapping Up
This is the part in which we conclude our guide hoping that we have assisted you in selecting the best kerosene heater for your needs. Undoubtedly, there is a lot to digest but we simply cannot give you only half of the useful information. Our goal is to have our readers prepared and ready for every challenge that their heater might present.
Leave a comment about our kerosene heater reviews article in case you have found it useful and interesting. Feel free to advise us on anything that you think we’ve missed or have portrayed inaccurately. Share the guide with your friends or others who might find it useful. You may also be interested in our other product guides like quiet portable air conditioner reviews. Thanks for reading and as always – stay put!
Leave a Reply